By Duane Friend, University of Illinois Extension
The right sump pump should be big enough to handle the expected volume of water and strong enough to get it outside the structure.
Sump pumps are the heart of most drainage systems, and they must be properly matched to soil conditions, pit size and other factors to eliminate short-cycling while still providing enough capacity for peak events.
In the ongoing battle for dry basements, sump pumps play a pivotal role. A pump typically has to be replaced every few years. But if it’s sized correctly, the pump will last much longer, and the homeowner will know it’s the right pump for the job.
When you’re selecting the size of a sump pump, you need two pieces of information: System Capacity (the amount to be pumped) and Total Dynamic Head (where it will be pumped).
Determine System Capacity
The first step is to determine system capacity. It’s important that your pump can draw water out of the basin (or “sump pit”) faster than water flows into it. Therefore, the first thing that needs to be measured is the amount of water that drains into the basin during a high-flow period.
Existing Construction: During a heavy rain, stick a ruler in the basin and measure how many inches of water flow into the basin in 60 seconds.
The easiest way to perform this test is to wait for a very wet, rainy day, and then run your sump pump until the water recedes to the shutoff level. Wait for one minute with the pump off, and then measure how far the water rose during that minute.
To calculate how many gallons flow into the basin per minute (system capacity), use the following rules of thumb: With an 18-inch-diameter basin, one inch of water is equal to one gallon. In the larger 24-inch-diameter basin, one inch of water is roughly equal to two gallons.
If you find out that more than 30 gallons of rainwater flow into the basin per minute, the installer would be better off with a 24-inch-diameter basin. Also, keep in mind that the water level should never be allowed to rise above the bottom of the sump’s inlet pipe (coming in from the foundation drain tile.)
Example: Using a ruler, you find that 18 inches of water are flowing into your sump pump basin every 60 seconds. Because you have the smaller (18-inch) diameter basin, each inch equals a gallon.
Therefore, your System Capacity is 18 gallons per minute.
New Construction: But what if it’s a new home and a system hasn’t been installed yet? In that case, here are some general guidelines:
On sandy soil, plan for a system capacity of 14 gallons per minute for every 1,000 square feet of home. In clay soil, plan for a system capacity of 8 gallons per minute for every 1,000 square feet of home.
Example: The home plans show a building footprint of 2,000 sq. ft. Because the home is on sandy soil, the sump pump system should have the capacity to pump 28 gallons per minute.
Determine Total Dynamic Head
Total Dynamic Head is equal to Static Head (or “vertical lift”) plus Friction Head.
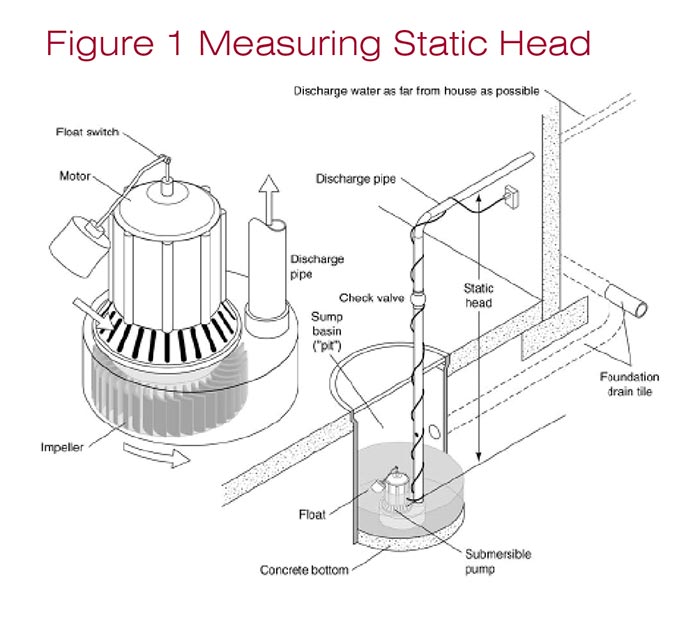
Static Head is the vertical height that the water rises from the pump intake to the end of the discharge pipe (or the highest point in the discharge line).
To determine Static Head, begin measuring from the point where water enters the sump pump. Then measure up vertically to where the pipe becomes horizontal. The weight of the water the pump has to lift is the Static Head, and is expressed in vertical feet (see Figure 1).
Example: Assume that the height from the sump pump to the point where the discharge pipe becomes horizontal is 13 feet. This is the Static Head.
Determining Friction Head is more involved than measuring Static Head. The formula for calculating Friction Head is “the equivalent length of pipe” plus the actual length of pipe multiplied by the “friction loss” divided by 100.
Here’s a step-by-step method:
Step 1. Determine “Equivalent Length of Pipe”: The “equivalent length of pipe” is determined by how many pipe fittings are in the discharge line as well as that line’s diameter. Table 1 shows the “equivalent length of pipe” for various fittings, based on pipe size.
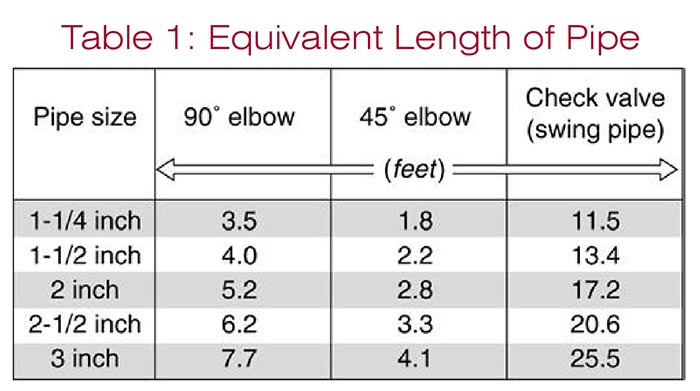
Example: Assume you’re using 1¼-inch pipe, with three 90-degree elbows and one check valve. According to Table 1, three elbows add 10.5 feet of equivalent pipe, while the check valve adds 11.5 feet. These fittings make the “equivalent length of pipe” 22 feet.
Step 2. Determine the Actual Pipe Length: The actual pipe length is the length of pipe running horizontally out of the house. You should be able to see where the pipe discharges outside of the house.
Example: In our example, the length of discharge pipe is 100 feet.
Step 3. Determine Friction Loss: Friction loss is how much friction slows the flow of water moving through the pipe. Table 2 shows what friction loss occurs for different pipe sizes, depending on how many gallons of water per minute move through the pipe.
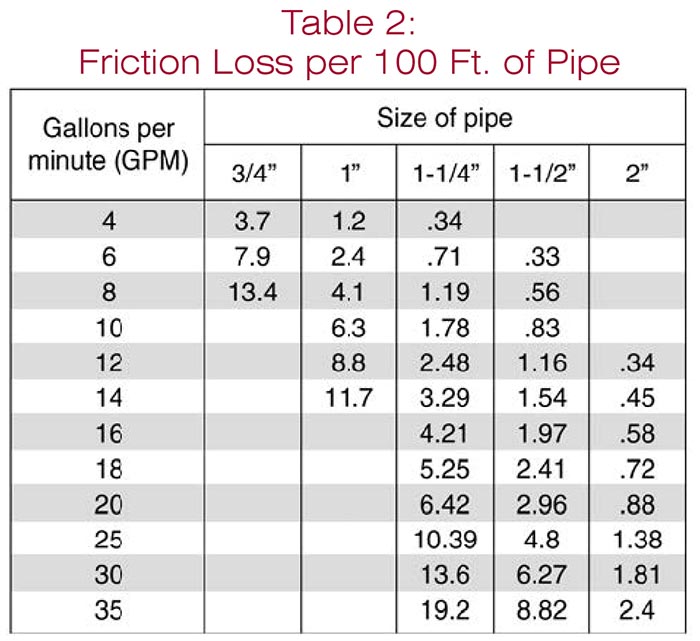
With Table 2, use your System Capacity number as the “gallons per minute.”
Example: If 18 gallons per minute flow through your 1¼-inch pipe, it would create a friction loss of 5.25 per 100 feet of pipe.
Step 4. Put it All Together: To figure out Friction Head, add the actual length of the discharge pipe to the “equivalent length of pipe” from fittings. Then multiply by the friction loss (from step 3) and divide by 100.
Example: Add the actual length of the discharge pipe (100 feet) with the equivalent length of pipe from fittings (22 feet) to get 122 feet. Then multiply this by the friction loss per 100 feet of pipe (5.25) and divide by 100.
122 x 5.25=640.5
640.5÷ 100 = 6.40
6.40 is the Friction Head
Now that we’ve determined Static Head and Friction Head, we simply add the numbers to get Total Dynamic Head.
Example: Add the Static Head (13 feet) to the Friction Head (6.40) to get a Total Dynamic Head of 19.40. Round up to 20 feet.
Selecting the Pump
You now know the System Capacity (18 gallons per minute) and you know the Total Dynamic Head (20 feet). So you’re ready to select a pump.
Most sump pumps have charts or curves that show how many gallons per minute they can pump for different lengths of head (See Figure 2). You’ve already determined how many gallons per minute must be pumped out. So look at these charts and make sure that the pump can handle that many gallons per minute.
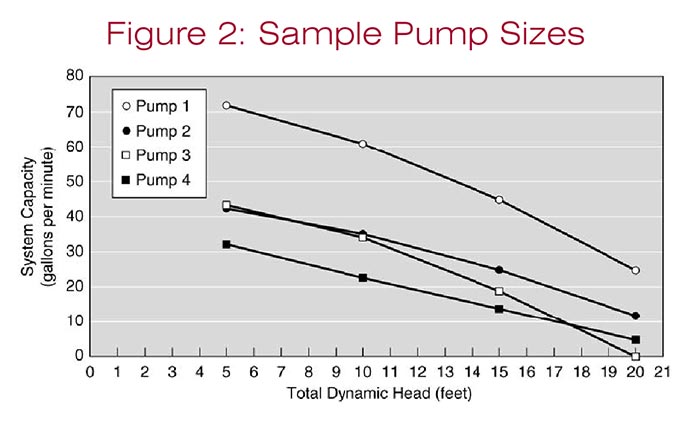
You don’t want a pump that is either too small or too powerful. If the pump is too small, it won’t be able to keep up with water flowing into the basin. If the pump is too powerful, it will “short cycle.” This means the pump will start and stop frequently, which can cause premature pump failure.
Example: If the Total Dynamic Head is 20 feet, you have only one choice among the four pumps shown in Figure 2. Only Pump 1 will be able to handle 18 gallons per minute. The other three pumps can’t handle any more than 12 gallons per minute.
Note that changing to a larger size of pipe in this case might lower the friction head enough to enable you to use a different pump (Pump 2 on the chart).
Maintaining the Pump
Sump pumps need periodic maintenance. You can make sure the system stays in top condition by doing the following:
• Check the operation of the float to make sure that its up-and-down movement is not restricted.
• Check the outdoor end of the discharge pipe when the pump is running to make sure it is discharging water. Several things can cause water not to be discharged, including a stuck check valve, the impeller loose on its shaft, or a plugged water pipe.
• If the pump has not had to run for several months, at the beginning of the rainy season put enough water in the sump pump basin to trigger the float switch. That way, you ensure that the pump is still operating properly.
Other Considerations
Basin Size: Most residences have an 18-inch diameter basin, or sump pit. Basin size plays a part in how long the pump runs and how long it takes to fill up. If your existing basin is undersized and fills too quickly between pumping cycles, it may be worth installing a wider basin to accommodate the flow.
A cheaper option may be installing an adjustable float switch that allows the water to rise to a higher level before turning the pump on. Most pumps depend on having water in the pump at all times to lubricate and cool pump seals. So make sure the float switch is positioned to prevent the pump from running dry.
Pedestal-type pumps have floats that can be adjusted to different lengths for operation.
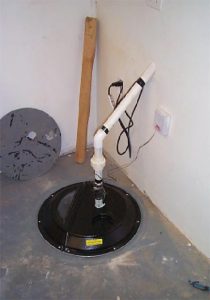
Check valve: Select a swing-type check valve of the same size as the discharge pipe. Install it just above the sump pump. The check valve keeps the water in the discharge pipe from flowing back into the basin between pump cycles.
Electrical Circuit: The sump pump must be supplied with its own dedicated motor control circuit and breaker. Be sure to observe all applicable local electrical codes and ordinances when installing electrical circuits.
Duane Friend is Extension Educator for Energy and Environmental Stewardship at the University of Illinois.
Spring 2013 Back Issue
$4.95
Properly Sizing Sump Pumps
Commercial Applications for Carbon Fiber:
Curtain Grouting in Residential Applications
PVC Membranes for Flat Roofs
AVAILABLE AS DIGITAL DOWNLOAD ONLY
Description
Description
Properly Sizing Sump Pumps
By Duane Friend
Sump pumps are the heart of most drainage systems, and they must be properly matched to soil conditions, pit size and other factors to eliminate short-cycling while still providing enough capacity for peak events.
Commercial Applications for Carbon Fiber:
This space-age structural repair material is moving beyond basement repair into parking garages, high rises, and other commercial spaces.
Curtain Grouting in Residential Applications
By Melissa Morton
Injecting polyurethane grout through below-grade walls to stop active water leaks is common in commercial work. But the technique has applications in the residential sector as well.
PVC Membranes for Flat Roofs
By Tony Matter
As the original single-ply roof membrane, PVC has a long and proven history. It’s still the roofing membrane of choice for many flat roof projects.
Additional Info
Additional information
| Magazine Format | Digital Download Magazine, Print Mailed Magazine |
|---|





Trackbacks/Pingbacks